A qualified mold inspector does far more than collect air samples. They investigate the moisture story of your home -- where water has been, where it still is, what it's doing to your building materials, and whether mold has taken hold as a result. The samples are one piece of a much larger investigation that combines interviews, visual assessment, moisture science, thermal imaging, targeted sampling, and professional interpretation.
If you've never been through a professional mold inspection, you probably don't know what to expect. This guide walks you through every step -- what happens, why it happens, what equipment is involved, and what you should see in the final report.
Step 1: The Interview and Property History
A good inspection starts before anyone opens a sample cassette or turns on a moisture meter. It starts with questions.
The inspector will ask about the history of the property: past water damage events, plumbing leaks, roof repairs, flooding, HVAC issues, or any previous mold remediation. They'll ask when you first noticed the problem -- a musty smell, visible discoloration, allergy symptoms that worsened after moving in -- and whether the issue seems to get better or worse with weather, seasons, or specific conditions.
This conversation is not small talk. The answers shape the entire inspection strategy. A home with a known history of slab leaks gets a different investigation than one where the homeowner noticed a musty smell only after the rainy season. A property with recent water damage gets different attention than one where symptoms appeared gradually over months. The inspector uses your answers to decide where to focus, which tools to prioritize, and what kind of sampling strategy makes sense.
Step 2: Visual Inspection -- Room by Room
After the interview, the inspector walks the property systematically. This is not a casual walkthrough. A qualified inspector examines every accessible room and space, looking for visible indicators of moisture intrusion and mold growth.
What they're looking for:
- Visible mold growth -- which can appear as black, green, white, or gray discoloration on walls, ceilings, and building materials
- Water staining on ceilings, walls, and around windows
- Warped, buckled, or deteriorating building materials
- Peeling or bubbling paint, which often signals moisture behind the surface
- Condensation patterns on windows, pipes, or cold surfaces
- Musty or earthy odors, and where they're strongest
- Signs of past water damage that may not have been fully addressed
High-priority areas they'll examine closely:
- Bathrooms -- around showers, tubs, toilets, and exhaust fans
- Kitchens -- under sinks, around dishwashers, behind refrigerators
- Laundry areas -- behind and beneath washing machines, dryer vents
- Attics -- roof sheathing, insulation, ventilation
- Crawl spaces -- vapor barriers, floor joists, subfloor
- Around windows -- frames, sills, and surrounding drywall
- HVAC systems -- supply and return registers, visible ductwork, drain pans
- Garage and utility areas -- water heaters, supply lines, hose bibs
The visual inspection establishes the baseline: what's visible, what's suspicious, and what needs closer investigation with instruments.
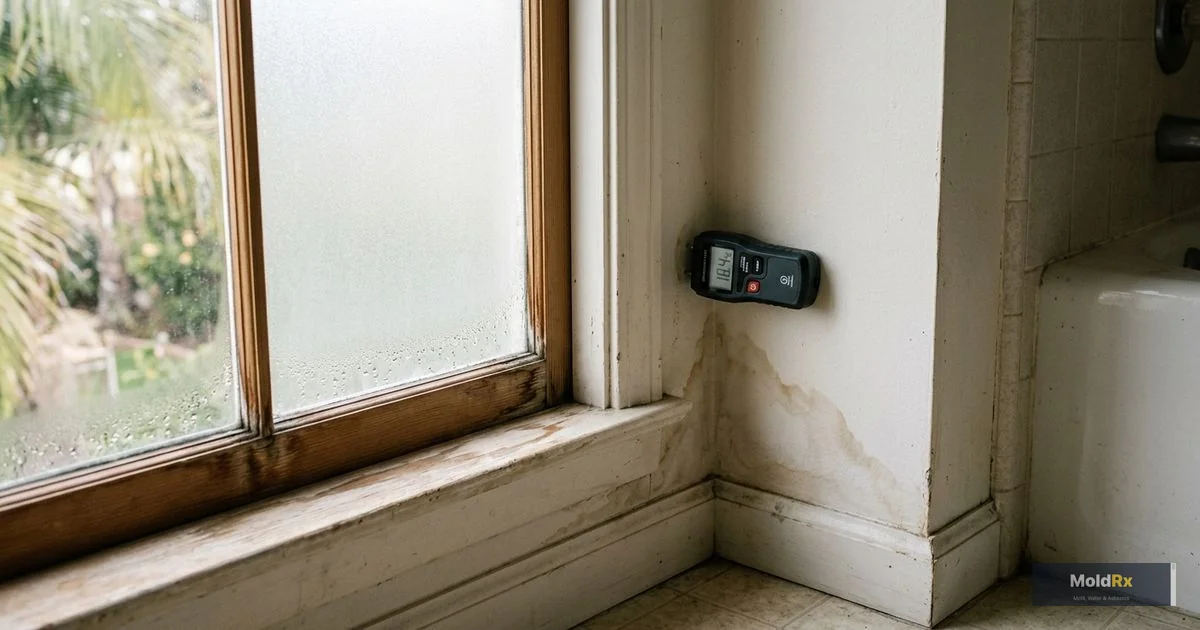
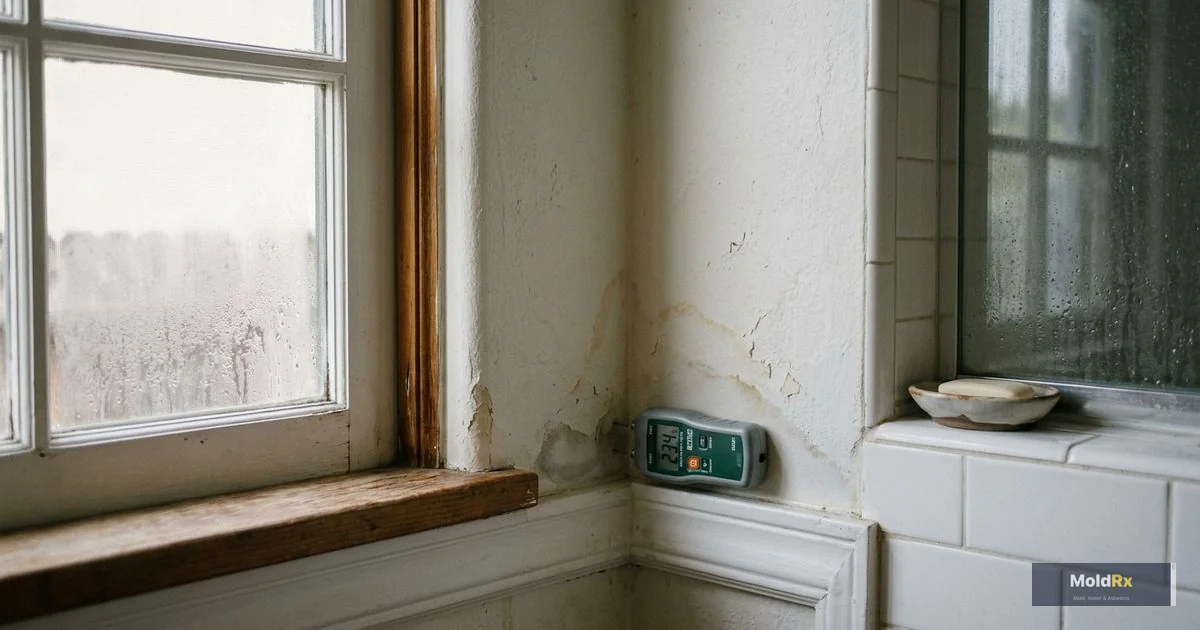
Step 3: Moisture Mapping
This is where the inspection moves from observation to measurement. Moisture mapping uses professional instruments to detect and quantify moisture inside building materials -- even when surfaces look and feel dry.
Why moisture mapping matters: Mold requires moisture. Finding elevated moisture tells the inspector where conditions are favorable for mold growth, even when no visible mold is present. It also identifies the moisture source -- which is the single most important finding in any mold inspection. Without correcting the moisture source, any remediation is temporary.
Pin-type moisture meters insert two small probes into the building material and measure electrical resistance. Wet materials conduct electricity more readily, giving a direct moisture content reading. The inspector takes readings at multiple points -- creating a grid pattern that maps moisture levels across walls, floors, and ceilings. A pattern of decreasing moisture radiating outward from a specific point tells the inspector exactly where the water is coming from.
Pinless moisture meters use electromagnetic signals to detect moisture without penetrating the material. They're faster for scanning large areas and useful on finished surfaces where pin holes would be undesirable -- hardwood floors, finished cabinetry, or tile backsplashes. Pinless meters are screening tools that quickly identify areas warranting closer investigation with pin meters.
Hygrometers measure relative humidity and temperature. The inspector takes readings in multiple rooms and in specific areas like crawl spaces, attics, and wall cavities. Humidity above 60 percent creates conditions favorable for mold growth; above 70 percent, growth becomes likely. A crawl space at 80 percent relative humidity tells a different story than one at 45 percent -- even if neither shows visible mold yet.
Step 4: Thermal Imaging
Infrared cameras detect temperature variations across surfaces. Wet materials absorb and release heat differently than dry materials, creating thermal patterns invisible to the naked eye but clearly visible on a thermal image.
Water-saturated drywall or insulation appears as a distinct cool zone because evaporation creates a cooling effect. The inspector can scan an entire wall in seconds and identify moisture intrusion that would otherwise require invasive testing to find. Thermal imaging also traces plumbing leak paths, identifies insulation gaps that lead to condensation, and reveals moisture migration patterns -- showing where water is traveling through building materials and helping the inspector determine the source rather than just documenting where moisture ended up.
Thermal imaging doesn't confirm mold directly -- it identifies the moisture conditions that cause mold. When the thermal camera flags an anomaly, the inspector follows up with moisture meters to confirm and quantify the finding.
Step 5: Sample Collection
Not every inspection requires sampling, and not every situation calls for the same type of samples. A qualified inspector determines the sampling strategy based on everything they've observed so far -- the interview, visual findings, moisture data, and thermal images. For a detailed breakdown of sampling methods, see our guide on types of mold testing.
Air samples (spore traps)
Air sampling is the most common method in professional mold testing. A calibrated pump draws a measured volume of air through a collection cassette containing a sticky surface that captures airborne particles, including mold spores. Each sample runs for five to ten minutes. The inspector collects samples from areas of concern, from unaffected rooms for comparison, and from outside the home to establish an outdoor baseline.
Indoor mold levels are always evaluated relative to outdoor air. An indoor reading of 500 spores per cubic meter might be perfectly normal if the outdoor control reads 2,000 -- or severely elevated if the outdoor control reads 50. An inspector who skips the outdoor sample is collecting data that cannot be properly interpreted.
Surface samples
When the inspector identifies visible growth or suspicious material during the visual assessment, they may collect surface samples to confirm what's growing and identify the species.
Tape lifts press clear adhesive against the surface to collect spores and growth fragments. Swab samples rub a sterile swab across the material. Both go to the laboratory for microscopic analysis or culture. Surface sampling answers a specific question: what is this material, and is it mold?
Bulk samples
In some cases, the inspector collects a small piece of the affected building material itself. Bulk samples allow the laboratory to assess how deeply contamination has penetrated the material -- information that's relevant for determining whether a material can be cleaned or needs to be removed.
How many samples?
The number depends on the size of the home, the number of areas of concern, and what questions need answering. A small apartment might need three to four air samples. A large home with multiple concerns might need eight to twelve or more. A qualified inspector explains their sampling plan before collecting -- why each sample is being taken and what question it's designed to answer.
Outdoor control samples
Every professional mold inspection includes at least one outdoor air sample, collected away from doors, windows, and obvious outdoor mold sources. This sample establishes the baseline for the outdoor air entering the home that day and transforms raw laboratory numbers into meaningful information. Without it, spore counts have no context. An inspector who doesn't collect outdoor controls is not performing a professional inspection. This is one of the simplest ways to evaluate whether you're working with a qualified professional.
Equipment Summary
Here is the standard equipment a professional mold inspector uses during a thorough inspection.
| Equipment | Purpose |
|---|---|
| Pin-type moisture meter | Measures moisture content inside building materials by inserting probes directly |
| Pinless moisture meter | Scans large areas for moisture without penetrating surfaces |
| Thermal imaging camera | Detects temperature patterns that reveal hidden moisture, leaks, and insulation gaps |
| Hygrometer | Measures relative humidity and temperature in the air |
| Spore trap cassettes and calibrated pump | Collects air samples for laboratory analysis of airborne mold spores |
| Tape lift kits and swabs | Collects surface samples from visible growth for species identification |
| Borescope camera | Inspects inside wall cavities and other concealed spaces through small access holes |
| Digital camera | Documents findings with photographs for the inspection report |
If your inspector arrives with nothing but a few sample cassettes and a pump, they're skipping the moisture investigation that makes the air sampling results meaningful.
How Long Does an Inspection Take?
A thorough mold inspection for an average-sized home takes two to four hours on site. Larger homes, properties with crawl spaces and attics, or situations with multiple areas of concern will take longer. A rough breakdown: 15 to 30 minutes for the interview, 30 to 60 minutes for the visual inspection, 30 to 60 minutes for moisture mapping and thermal imaging, 30 to 60 minutes for sample collection, and 15 to 30 minutes for documentation and an on-site summary.
After the on-site work, samples go to an AIHA-accredited laboratory. Lab results typically take two to five business days, and you should receive the full written report within three to seven business days of the inspection. Be skeptical of anyone who promises a complete inspection in 30 to 45 minutes -- they're either skipping steps or their definition of "inspection" is limited to collecting a few air samples without the investigation that makes those samples meaningful.
What the Report Looks Like
The inspection report is the document you'll use to make every decision that follows. A professional report should include all of the following.
- Property and project information. Address, date, inspector credentials, reason for the inspection, and scope of work.
- Room-by-room findings with photographs. Each area described with specific observations -- not "mold was found in the bathroom" but where it was found, on what material, the approximate extent, and what moisture data showed. Photographs should support every significant finding.
- Moisture data. Readings documented in a table or floor plan map showing which areas had elevated readings and how they relate to visible findings or suspected sources.
- Thermal imaging results. Annotated thermal images with explanations of anomalies and how they were confirmed with other instruments.
- Full laboratory report. The original report from the AIHA-accredited laboratory -- spore counts by genus, concentrations per cubic meter, and comparison across sample locations including the outdoor control.
- Professional interpretation. The inspector should explain what the results mean in plain language -- which findings are normal, which are elevated, and what the species distribution suggests about moisture conditions.
- Conclusions and recommendations. Does a mold problem exist? How extensive is it? What's causing it? If remediation is warranted, the report should describe the scope in enough detail that remediation companies can prepare accurate bids.
What Happens After the Inspection
If the report shows no significant mold problem: Keep it. A clean report is valuable documentation for real estate transactions, insurance records, or future reference. Follow any prevention recommendations the inspector makes about moisture conditions.
If the report confirms a mold problem: Take it to two or three qualified remediation companies and request bids based on the inspector's findings. Because each company is working from the same objective assessment, you can compare bids on an apples-to-apples basis.
After remediation is complete: Your original inspector -- or another independent professional -- performs clearance testing to verify the work was successful. If clearance passes, the project moves to reconstruction. If it fails, the remediation company performs additional work and the inspector retests.
The key principle: the person evaluating the problem and the person fixing it should always be different parties.
How to Prepare Your Home for a Mold Inspection
A few simple steps help your inspector work efficiently and get the most accurate results.
- Don't clean or disturb suspected mold. Leave visible growth alone -- cleaning removes evidence the inspector needs.
- Ensure access to all areas. Clear items from walls where you've noticed issues. Make sure the inspector can reach attic access, crawl space entrances, and areas under sinks.
- Turn off air purifiers and keep windows closed for 24 hours before the inspection. The air samples need to reflect normal living conditions, not filtered air.
- Minimize activities that disturb the air. Avoid vacuuming, sweeping, or heavy cleaning on inspection day.
- Have your records ready. Documentation of past water damage, previous inspections, or remediation work helps the inspector focus. Write down when you first noticed the issue and which rooms seem affected.
Frequently Asked Questions
Do I need a mold inspection if I can already see mold?
Yes -- a professional inspection determines whether contamination extends beyond what's visible, identifies the species, finds the moisture source, and creates baseline data needed for clearance testing after remediation. It also produces an independent scope of work that prevents remediation companies from inflating the project.
How is a mold inspection different from a home inspection?
A general home inspection covers major systems -- roof, plumbing, electrical, HVAC, structure. It may flag visible mold, but it's not designed to investigate mold specifically. A mold inspection uses specialized equipment, laboratory analysis, and focused methodology to evaluate indoor air quality and moisture conditions. If your home inspector flags potential mold, hire a dedicated mold inspector.
Can the inspector tell me the results on the spot?
The inspector can share preliminary visual and moisture findings on site. However, air and surface sample results require laboratory analysis, which takes two to five business days. Any inspector who "reads" air samples on-site or identifies mold species by looking at it is not following professional standards.
What if the inspector finds nothing?
A clean inspection is valuable information, not wasted money. The report documents that professional testing found no significant mold contamination at the time of the inspection -- which is useful for peace of mind, real estate transactions, and insurance records. If you still smell mold despite a clean report, discuss next steps with your inspector -- intermittent conditions, HVAC-related issues, or other explanations may warrant follow-up investigation.
Should I be home during the inspection?
Yes, ideally for at least the beginning of the inspection. The interview portion is most productive when the inspector can speak directly with whoever has been living in the home and observing the issues. You can also point out specific areas of concern and share observations that might not be in any written record.
Will the inspection damage my home?
A standard inspection is non-invasive. Pin moisture meters leave tiny holes smaller than a nail hole, and borescope inspection requires a small drilled hole if used. Thermal imaging, air sampling, and pinless moisture scanning leave no marks at all. If the inspector recommends opening a wall, they'll discuss it with you first.
How often should I have my home inspected for mold?
There's no universal schedule. Most homeowners pursue testing in response to a specific concern -- a musty smell, visible growth, water damage, or a real estate transaction. If your home has a history of moisture issues, periodic professional assessment may be prudent. For more on when mold testing makes sense, see our dedicated guide.
Can I do my own mold testing instead of hiring an inspector?
DIY mold test kits lack the moisture investigation, thermal imaging, outdoor controls, and professional interpretation that make a professional inspection meaningful. They cannot distinguish between normal background mold levels and actual contamination. For a thorough assessment, hire a qualified professional.
What should I do if my inspector recommends a specific remediation company?
Be cautious. A truly independent inspector should not have a financial relationship with any remediation company. Ask directly whether they receive referral fees or have any business relationship. The safest approach is to find your remediation company independently, using the inspector's report as the basis for competitive bids.
Does the inspector test for health effects of the mold they find?
No. Mold inspectors evaluate the presence, extent, and species of mold contamination and the moisture conditions driving it. They do not diagnose health conditions or make medical claims. If you have health concerns related to mold exposure, consult your physician -- the inspector's report can be useful information for your doctor.
Ready to Find Out What's Happening in Your Home?
A professional mold inspection gives you an objective, documented understanding of your home's indoor environment -- not guesswork, not scare tactics, and not a sales pitch. The right inspector shows up with the tools, training, and independence to investigate your situation honestly and give you the information you need to make informed decisions.
If you're dealing with a musty smell, visible growth, water damage aftermath, or unexplained symptoms and want to understand what's actually going on, call (888) 609-8907 or request a free estimate online. We coordinate independent mold testing and qualified remediation services and will help you take the right next step for your situation.
Latest Mold Articles
View all articles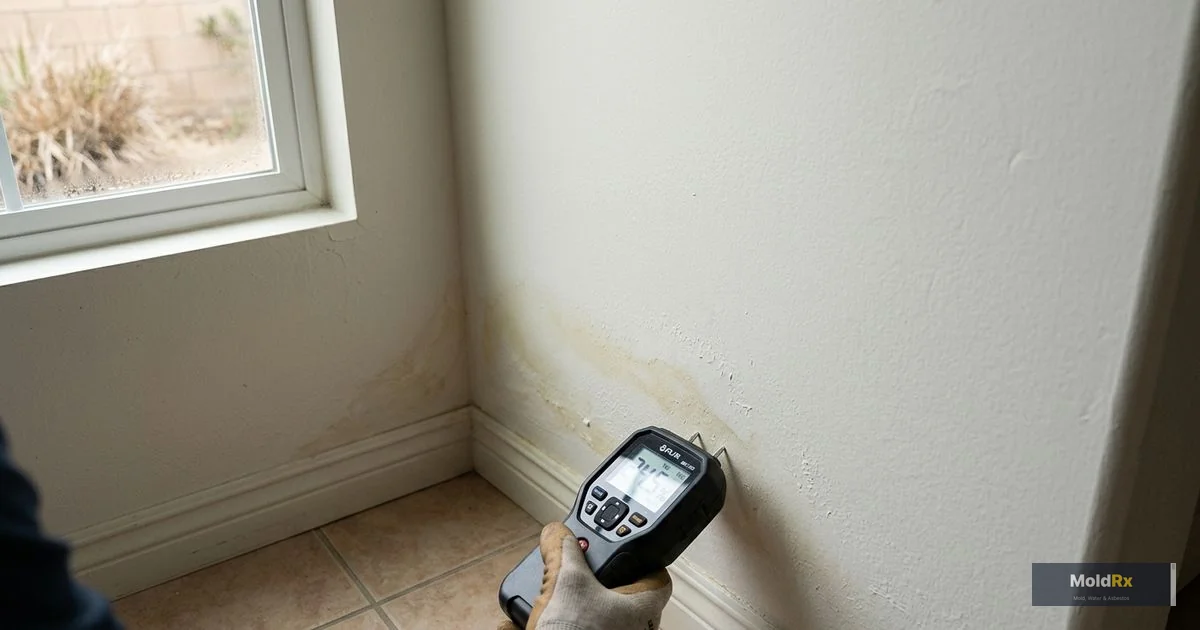
When Mold Testing Is Worth It — and When It's Not
If you can see mold growing in your home, you usually don't need to pay for testing before removing it — that's money better spent on remediation. But there are specific situations where testing saves you money and protects your health, your home, or your legal position. Here's an honest breakdown of when mold testing is worth the investment and when you can skip it.
What a Mold Inspector Actually Does During a Home Inspection
A qualified mold inspector does far more than collect air samples. They investigate your home's moisture story -- mapping hidden dampness with professional meters, scanning walls with thermal cameras, collecting targeted samples for laboratory analysis, and documenting everything in a report that tells you exactly what's happening and why. Here's a step-by-step walkthrough of the entire process.
Types of Mold Testing: Air Sampling, Surface Sampling, and Which You Need
There are three main types of mold testing -- air sampling, surface sampling, and bulk sampling -- and each answers a different question. Air sampling tells you what's floating in your indoor environment. Surface sampling identifies what's growing on a specific material. The right method depends on whether you're chasing a musty smell, identifying visible growth, buying a home, or verifying remediation.